
The PanoCamAdder is an addon for Blender.
It is helpfull to create 3D models from equirectangular panoramas.
The PanoCamAdder is also helpfull for creating models especially for KRpano 3D-depthmap panorama tours.

The addon comes in two versions:
PanoCamAdder (free)
- Add PanoCam:
- 360°-viewer camera setup
- panorama material for the model
- desaturated panorama world for the background
- Add Hotspot:
- Hotspot placeholder with correct size and rotation.
You can add multiple PanoCams, Materials and Worlds to each file!
PanoCamAdder+ (10+€)
- All free features.
- Add ImageHotspot:
- Choose an image from your system. It will be added as texture on a plane with correct size and rotation.
- Easy toggeling between different 360 cameras.
- Easy toggeling between different panorama materials/worlds.
- Zoom slider for the 360 viewer.
- Quick viewport settings.
- Prepare the models for KRpano with just one click.
- KRpano Values: Read out the panorama/hotspot/view positions/rotations (translated to KRpano 3D space) to create 3D-depthmap panorama tours.
- KRpano to Blender: Import finished 3D-depthmap models and bring them to the right location/rotation.
- Print preformed xml code for positioning panoramas and hotspots quickly in KRpano.
- Create and bake a dollhouse texture from multiple pano materials
- Create and print polygonal hotspots
- Render panoramas of any 3D scenes and outputs the exact values for the positions.
Download (Gumroad):
The PanoCamAdder+ is full compatible to the free vesrion!
Means: If you start with the free version, you can finish your project with PanoCamAdder+.
Documentation (PCA+ 2.0)
- Add PanoCam
- Add Hotspot
- Add ImageHotspot
- 360Viewer
- Viewport Settings
- Helpers/Materials
- Krpano To Blender
- Export
- KRP Values
- Dollhouse Texture
- Baking
- Polygonal Hotspots
- Blender To Krpano
Add PanoCam
- The ‚Add PanoCam‚ button creates a 360-viewer camera, a panorama-material and a desauturaded panorama-world for the background.
- The filebrowser window opens, when you hit the button . Select a panorama image (jpg, png, tiff) from your system and set the name and camheight.
- If you have selected a mesh before hitting the button, the new material will be applied to the mesh.
- Uncheck ‚Material/World‘, if you just need a PanoCam.
Add Hotspot
- Hit the ‚Add Hotspot‚ button and set the name and the backgroundcolor.
- The front side is marked by a texture that shows the center and the bottom. To see it, the material preview must be turned on in the viewport-shading .
- The default scale value is 0.5. Scale in object-mode around all axis at once to get different scale values.
- Edit the hotspot in edit-mode to get different values for width/height. Incorrect editing is noticeable by the bounding box becoming visible.

Add ImageHotspot
- Hit the ‚Add ImageHotspot‚ button, select an image file (jpg, png, tiff) from your computer and set a name for the hotspot.
- Scale and rotate in object-mode.
360 Viewer

- Here you can choose one your currently added cameras for the 3Dview.
- If Material/World is activated and a mesh is selected, the corresponding material will be applied to the mesh. Just select your model to apply the different panoramic materials.
- If a camera is selected you can zoom in/out or look directly to the horizont, zenith and nadir.
Viewport Settings
Here you can quickly show or hide different things in the viewport.
- Wireframe (shows the meshes with wireframe)
- Face Orientation (blue/red sided faces. Only the blue sides are visible in krpano)
- Relationship Lines
- Floor
- Extras (show/hide emtys and cameras)
- Background (show/hide the panorama-world )
Helpers
- Flip Normals (to fix wrong face-orientations)
- Merge Verticies (to combine different parts of a mesh)
Materials
- Depthmapped (for finished 3D-depthmaps)
- UV Texture (for the ‚dollhouse‘)
- UV Checker (to check the UV layout)
KRP to Blender
You can import already used 3D-depthmaps into blender and bring them to the correct location. This can be usefull if you want to retouch your models later on for example.

Import your model as usual. Paste a krpano code-snippet and keep sure the model is selected. Then hit the corresponding button.
Export
To prepare the model for using with krpano do the following steps:
- Select one (or more) ‚_HANDLE‘ and your model.
- Keep sure, the model is the ‚active object‘.
- Press ‚Make ExportReady‘.
This wil create two new folders. DEPTH3D and TOUR3D:
- The DEPTH3D folder contains all finished 3D-depthmaps, ready for to use within krpano. Just export them from here.
- The TOUR3D folder contains all finished 3D-depthmaps perfect aligned to each other. Use this arrangement to read out the values, add hotspots, add more finished models, floors, …

Export STL:
Go to File/Export/Stl(.stl).
Dont forget to tick:
- Ascii
- Selection only
Export OBJ:
Go to File/Export/Wavefront(.obj).
Dont forget to tick:
- Selection only
If you want to use the model as textured ‚dollhouse‘, you have to create a uv-layout/texture first -as shown in this tutorial.
KRP Values
Creating 3D-depthmap panorama tours
If you want to create 3D depthmap panoramic tours in KRpano, you need the exact position and rotation for each panorama and hotspot.
So you need an arrangement with all finished models, panocams and hotspots.
The TOUR3D folder contains just such a scene if you want to use a different model for each panorama.
If you want to use one single model for all panoramas, you can use the model with the well placed pano_CAMs.
- select the models in the TOUR3D folder or the pano_Handles in the single model to read out the values for the panorama/depthmap
- add hotspots to the arrangement and get the values for location, rotation, scale, width, height, backgroundcolor, alpha, image-url
- you can print simple preformed codes
<style name="bad_STYLE" ox="223.53" oy="-132.0" oz="456.76" prealign="30.87|-76.9|0.0" />
<style name="kueche_STYLE" ox="16.34" oy="-132.0" oz="522.04" prealign="-40.9|-61.26|8.63" />
<style name="Wohnzimmer_STYLE" ox="0.0" oy="-132.0" oz="0.0" prealign="48.16|11.47|7.24" />

<!-- kueche_HANDLE -->
ox="16.337952" oy="-131.999993" oz="522.036219"
origin="-0.16338, 1.32, -5.220362"
align="-11.346717|68.664356|40.336314"

<hotspot name="hs-wohnzimmer" type="text" keep="true" style="MyStyle"
    tx="0.0" ty="-1.96" tz="0.0"
    rx="-90.0" ry="-0.0" rz="-0.0"
    />
Dollhouse texture
The various pano materials can be automatically distributed to the model:
Select all Pano_HANDLEs and lastly the model (must be the active object) and then click Distribute Pano-Mats.

The materials will then be distributed to the model in such a way that always the shortest distance from the HANDLE to the Face(center) is chosen. This is usually the best method.
In some cases, it may make more sense to choose the better angle rather than the shorter distance. This can be done with the checkbox ‚Angle-based‘. Additionally a maximum distance can be specified. Within this distance panoramas with a better angle will be searched.
If a face(center!) is not visible from any pano_CAM, it gets a no_MAT material. So these surfaces can be easily selected later to assign another material.
If no matching material can be found for a _HANDLE, an x_panoMAT is created and assigned. This can then be easily exchanged.
The colors for the no_MAT and x_MAT can be preset in the preferences.
Baking the UV texture:
To bake the UV texture, you now only need a single click:
Select the model, specify the name and size for the texture and click ‚Bake uv texture‘.
If the model does not contain a uv layout, one is created.
However, it will not check if the included uv-layout is up to date.
So make sure you have a current uv layout!

The render/bake settings are adjusted to the Pano_Material(emission) so that it can be baked very quickly.
The texture can then be found in the image editor window after a few seconds.
Polygonal hotspots

Model polygonal hotspots and output the points as krpano polygonal hotspot code.
If the polygonal hotspot mesh is not planar, it can be split using the ‚MeshSplitter‘. This way, three-dimensional polygonal hotspots can also be created.
Blender 2 krpano
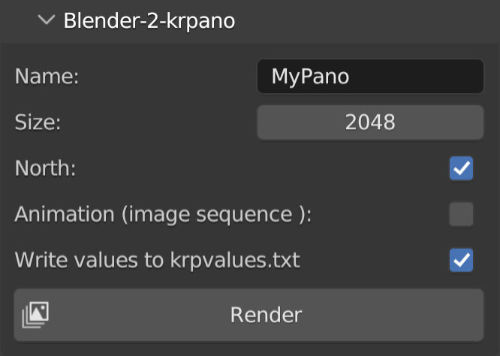
Renders panoramas of any 3D scenes and outputs the exact values for the positions. So you can easily create 3D panorama tours with krpano.